Viewmagic Mounting Prints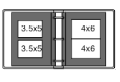
The way you mount and present your 3-D Mounting Types photographs can make a
big difference in how much you and your friends enjoy looking at them. Choosing
the right kind of mounting materials and careful alignment of the prints are the
most important steps next to taking the photos correctly.
The main requirement is to hold your two photos flat and in proper alignment
to each other. This can be as informal as taping your photos to a 5 x 8 inch
index card, or as formal as mounting them in a fancy picture frame. The choice
is up to you.
One popular type of photo album uses a wax-coated page with a clear plastic
overlay sheet. The main drawback is that reflections from the overlay sheet can
be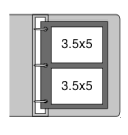 distracting. The most
convenient and flattering way to show off your 3-D photos is to mount each 3-D
pair on a separate black card. An option is to punch the card for placing in a
loose-leaf album. Then, when crowds of friends want to see your work, just slip
the pages out of the album and pass them around. Of course, it's handy to have
more than one Viewmagic 3-D Viewer available on such occasions.
distracting. The most
convenient and flattering way to show off your 3-D photos is to mount each 3-D
pair on a separate black card. An option is to punch the card for placing in a
loose-leaf album. Then, when crowds of friends want to see your work, just slip
the pages out of the album and pass them around. Of course, it's handy to have
more than one Viewmagic 3-D Viewer available on such occasions.
To reduce distracting reflections, order matte finish instead of glossy
prints. You can also use a clear matte spray finish to remove the gloss from
prints. For a professional look and to make your photographs appear brighter,
mount your prints on flat black index card stock. Use a mounting system that
allows repositioning before the final attachment. Small individual squares of
double stick tape on the back corners of each print work well. These are
available at stationery stores specifically for photo mounting purposes.
 The
first step in mounting your prints is figuring from out which is the left
(bottom) print and which is the right (top) print. There are two clues to help
you decide:
The
first step in mounting your prints is figuring from out which is the left
(bottom) print and which is the right (top) print. There are two clues to help
you decide:
1. If the image contains an object which faces the R camera, the
right print will show more of the right side of the object. The left print will
show more of the left side of the object. L
2. If the image has objects which are positioned one behind the
other, the right print shows the back R object further to the right of the front
object than the left print shows.
The print of the right view
is mounted in the top position; the left
view goes in the bottom position. Take
a look at some of your 3-D photographs, as well as the examples in this manual.
These clues should start to become clear. Of course, if all else fails, try
placing the photos one way, then the other while viewing them with your
Viewmagic 3D Viewer. When placed the wrong way, the photo appears to be in 3-D
but objects look somehow wrong, or oddly placed. This is caused by giving the
brain conflicting depth cues. When placed right and aligned reasonably well, the
photos are in obviously good 3-D.